

Hello, this is Eric the BlenderNoob, and I want to get you excited about Blender. Blender is a powerful tool that can be used for everything, from creating beautiful works of art to designing models and simulations. 2D/3D sculpting, animation, texturing – Blender can do it all.
What’s best is that Blender is free and open source, which means the software is super accessible and constantly improving from feedback from hundreds of Creators like us.
For context, Blender has been around for almost 30 years, and although I'd heard about it, I'd never engaged with it much. Admittedly, I was learning Maya, CD4, ZBrush, and cool simulation software, but after using Blender for about eight months, I had already started to feel like it had become one of the most significant tools in my kit.
I'm hoping this article will give some Blender newcomers some inspiration, and for the veterans-- there's never a wrong time for a refresher. In this blog post, I'll go over the basics, jump into projects, and then talk about lighting, animating, sculpting, and rendering. I've included links to some great tutorials so you can learn more from other Creators bringing new worlds to life on Blender.
Basic Editing
To start, within Blender, there are two basic modes to know: Object Mode and Edit Mode.
Object Mode allows you to position, rotate, and scale models, whereas Edit Mode allows you to change the geometry of your model. In Edit Mode, there are three different selection modes: vertices, edges, and faces. Vertices are small vector dots that outline the structure of a model. Edges are lines that connect vertices, and faces are the connections between the segments and vertices.
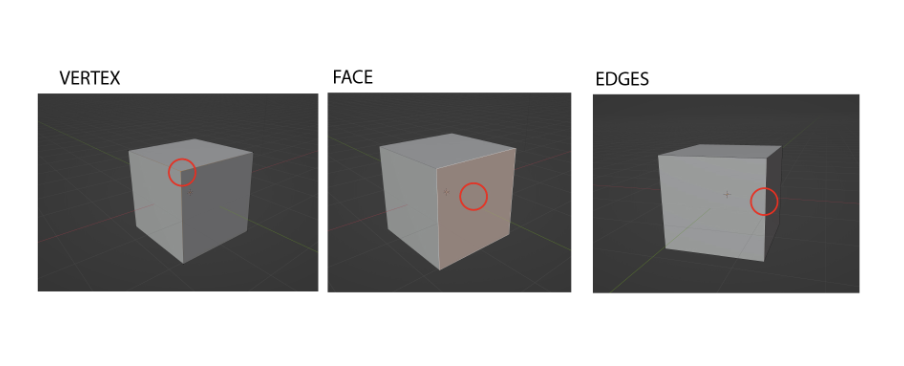
The best way to learn how to manipulate the model is to simply start with these manipulation tools. There are tons of great YouTube tutorials that range from very simple to advanced that will explain the methods of creating any type of model you desire. Also, you can deform the model by sculpting using the Sculpt Mode, which involves using tools that push and prod the model, as if it were clay. There are also many add-on that can deform the model.
Blender Modifiers
Let’s chat about the modifiers. Modifiers are sort of built in plugins that allow you to alter your models. Some are specific to the area that you are working in. There are modifiers for Object Mode, Edit Mode, and Sculpting Mode.
Some modifiers will create an ocean, some let you paint on a model, and some do crazy deformations. I’m going to talk about two very exciting ones: the subdivision surface and Boolean.
With the subdivision surface modifier, Blender will allow you to add more subdivisions to your model in a Preview Mode, so you can see what it would look like at higher divisions, and then you can apply the subdivisions to have it fixed to gain greater complexity as you build your model. In fact, that is how all the modifiers work. It’s applied as a preview, and then you can apply it to the model as fixed.
The Boolean modifier is an intersection, union, or difference modifier. If you overlap two models, you can have them merge as one or you can have the second model’s shape subtract from the first model's shape. It’s a great way to build a very interesting and complex shape.
Creating a Simple Scene
Now that you see the limits of this powerful software with the example above, let's get down to some basic scene structuring.
In the example below, I imported a vector heart shape from Adobe Illustrator and saved it as a SVG file.
You can create any closed shape from Adobe Illustrator and extrude it in Blender as a 3D model. Here, I imported it and initially it’s brought in as a curved shape. I will extrude it just a bit and then turn it into a mesh shape. Let’s position it!
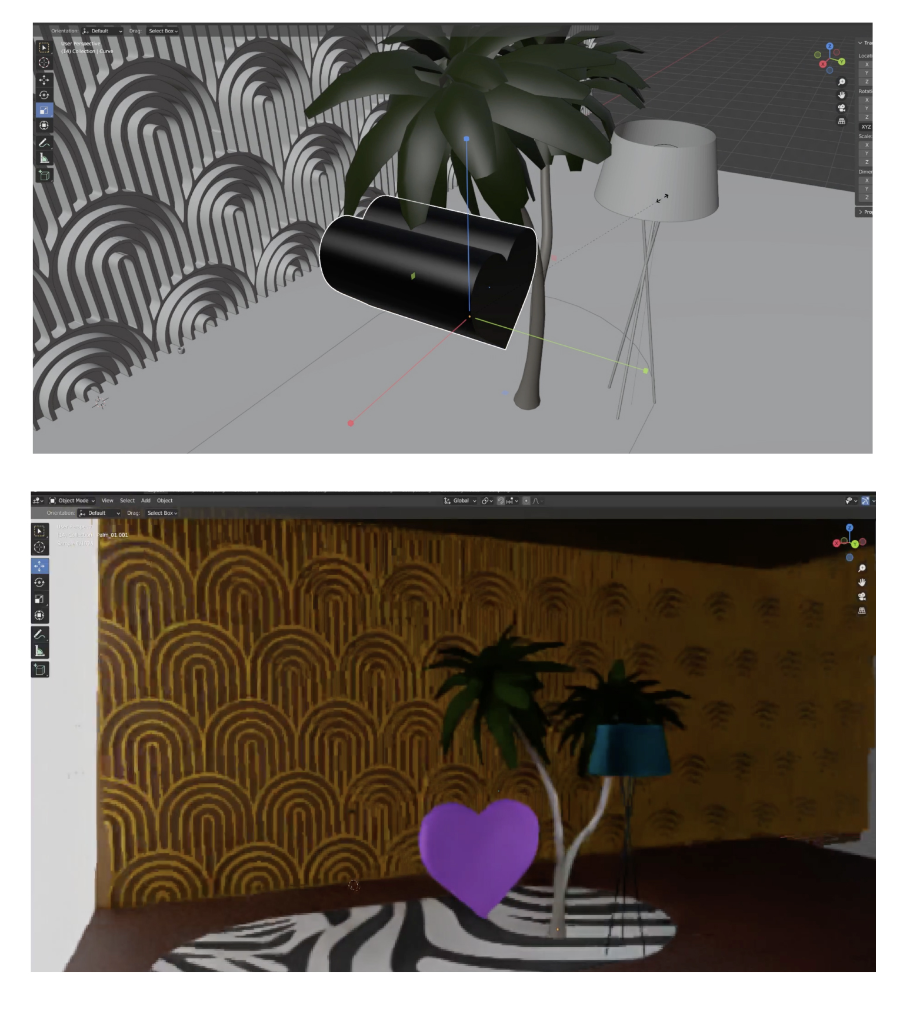
I also created a plane as the floor, and I have a fun lamp model and palm tree model that I got from Blender Swap as well. Now I will position all the elements into a nice composition. The ornate background was also imported as an SVG file from Adobe Illustrator and has a nice golden material.
I duplicated the plane and will use that as an emission light. Let’s push that on top, and now we have a simple scene. Now I will render these using cycles.
Flip Fluids
Blender has a huge amount of wonderful third-party support apps called add-ons. There are hundreds of very useful, small add-ons for Blender. Think of them as plug- ins. They range from animation assistants, UI enhancements, model creation assistants and coding additions.
I want to speak about one of my favorite add-ons called FLIP Fluids, an incredible add-on liquid simulation tool that is one of the best liquid simulations I’ve seen. It’s super fast and very easy to use.
The add-on costs $70 for what would cost hundreds on other platforms. You can get it via Blender Market. Once purchased, the plug-in is loaded via the preference panel and then shows up on the plug-in area.
To create FLUIDS, first you will need create a place where the fluids will be contained known as a Domain Container. I imported my heart SVG vector from Illustrator, extruded it, and turned it into a mesh, and then used that as my container. Then, you can create the emitter for the fluid. This has to be placed inside the domain container. Then, you simply bank the simulation, and that’s it! A beautiful liquid simulation is created, super accurate physics.
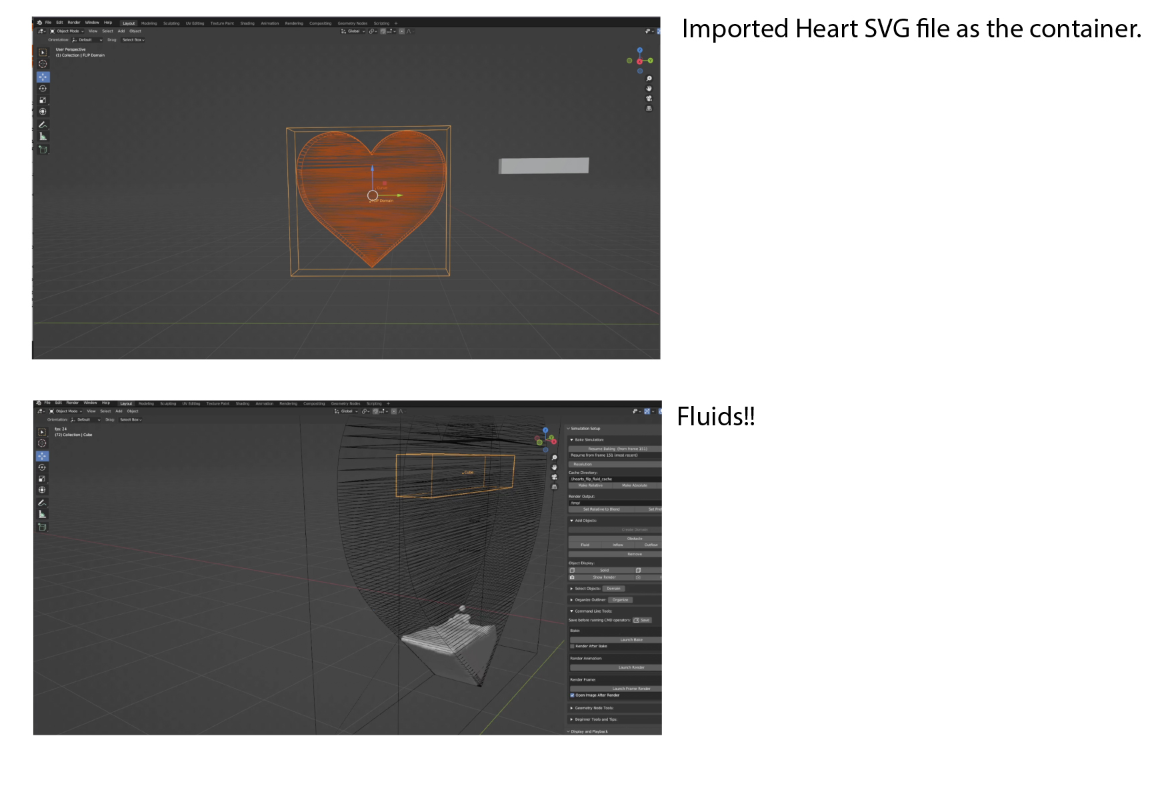
I imported an SVG file from Adobe Illustrator, uploaded it to Blender, then extruded it. I made the heart the container and added a cube as an emitter. The heart shape is filled with liquid.
If you're ready to take your Blender-ing to the next level, check out some intermediate and advanced tutorials that'll help you kick things up a notch:
__
Note From Tongal: This blog is part of a series of Tongal Community-written blog posts that were originally sourced in the Tongal Blog Open Call Project. The views and opinions expressed in this article are those of the author(s) and do not necessarily reflect the official policy or position of Tongal. Read more Tongal Community-written posts here!