Your film has just been accepted by a prestigious festival and your dreams of becoming a Hollywood director are a little bit closer. However, before you start celebrating, you need to produce key art that will promote your cinematic creation and grab the attention of your audience. This can be a very expensive undertaking as hiring a professional graphic designer to create an attractive poster for your film can cost hundreds, or possibly, thousands of dollars.
Canva can help you in this process by providing free and easy templates that will allow you to quickly produce professional-looking key art for your film. This article will save you money and headaches by taking you through the step-by-step process of creating promotional images – both for the festival’s program and for various social media channels – for your festival film.
Step 1: Selecting an Image
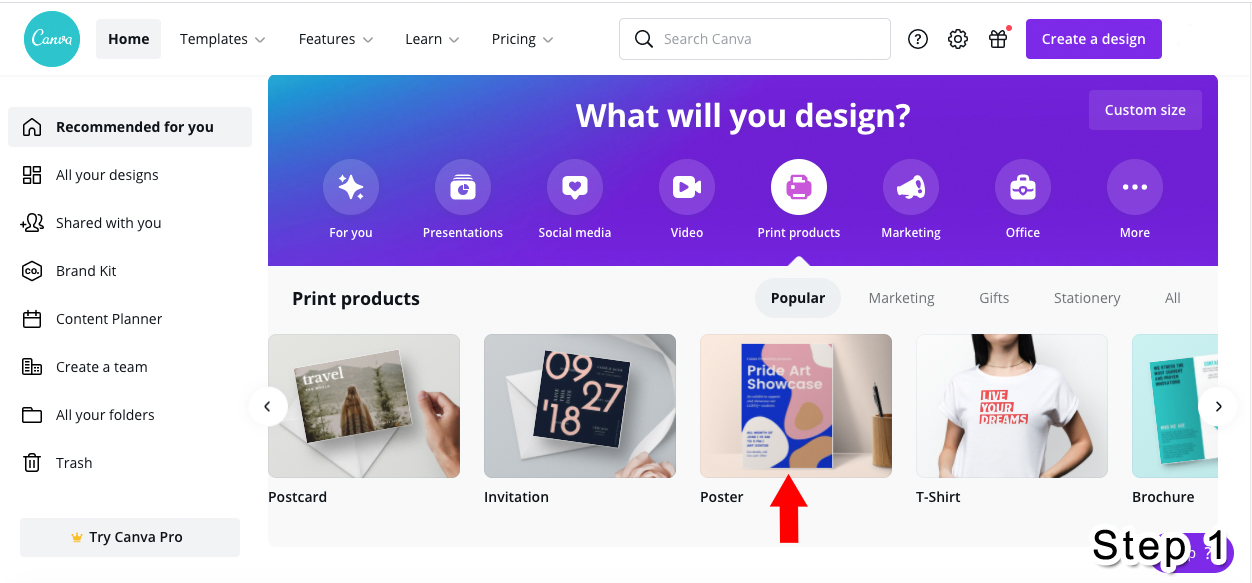
Head to Canva’s website and begin exploring their design platform. We will start by clicking on the “Print Products” option under the “What Will You Design?” menu at the top of the screen and then selecting “Posters.” Canva will then generate a blank canvas that measures 18 X 24 inches and will have an aspect ratio of 3:4 (the typical dimensions of a standard film poster), which we can use to create our key art.
We will then scroll down to the “Movie Poster” option in the left-hand menu and either select an image from the Canva library or import an original photo by clicking on the “Upload” button. As a side note, if you do not have specific promotional images that you shot for your poster, you may choose to use individual stills from your film as the backdrop for your key art. For my purposes, I chose a template from Canva’s catalog that I felt captured the spirit of my film (keep in mind, certain images from Canva’s library require a subscription while others are free).
When selecting the photo for your poster, try to use an iconic image that will immediately establish the tone and genre of your film. For example, the backdrop for a horror movie will generally include a cooler colour palette (ex. blues and greens) whereas if your film is an upbeat romantic-comedy, you may wish to use a photo with a warmer colour palette (ex. yellows, oranges and reds).
Step 2: Editing the Image
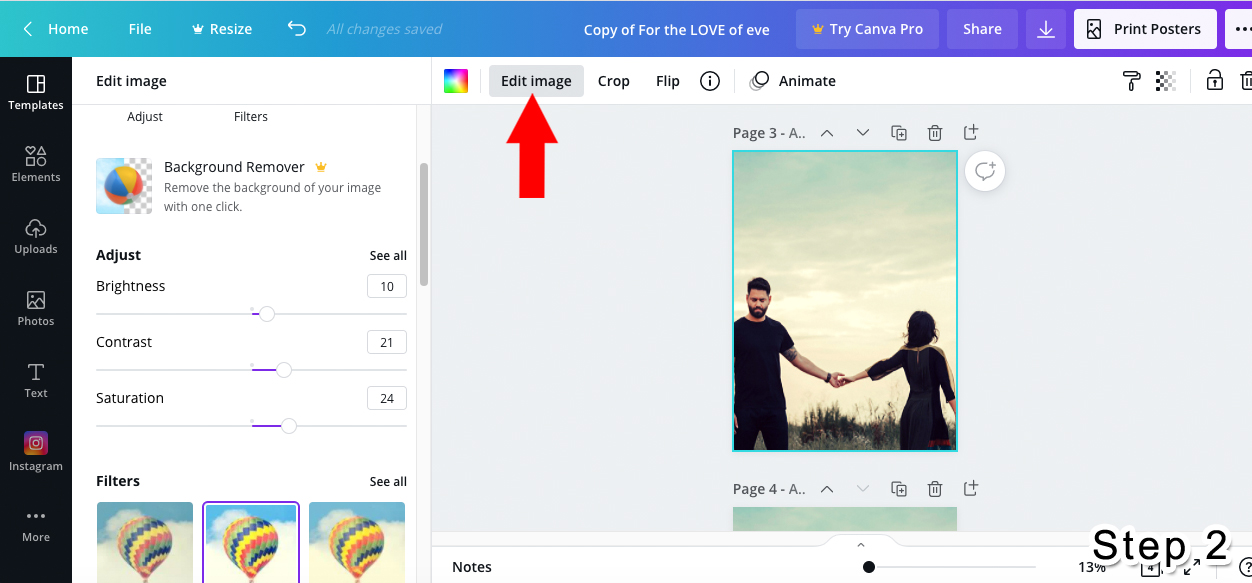
Once you have selected your image, begin editing it so that it looks professional and matches the tone of your film. In order to perform this action, you will click on the background photo and select the “Edit Image” option in the top menu which will cause a series of bars to appear that will allow you to alter the Brightness, Contrast and Saturation of your key art. Once you are satisfied with its appearance, click the “Add A Page” button below the canvas in order to create a duplicate copy of your image so that you don’t have to repeat this process each time you wish to alter it. Also, it is wise to have copies of your key art both with text and textless in order to provide festival organizers plenty of options when promoting your film at different marketing venues.
Step 3: Adding Text
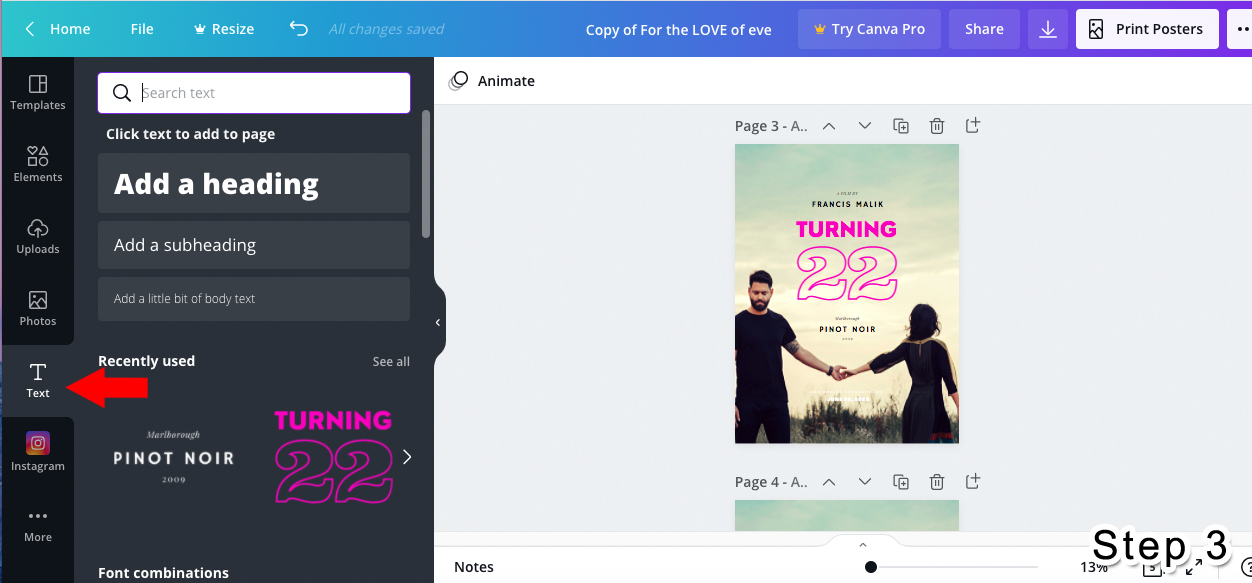
Now that your background image is perfected, begin adding text to your poster in the form of a title, credits, and possibly some quotes from critics. You may perform this task by clicking on the “Text” option in the left-hand menu and selecting a font style that appeals to you and expresses the genre of your film. Canva has an enormous selection of font types in its catalogue that range from serious and dramatic to fun and bubbly (certain font types require a subscription while others are free). For my poster, I chose the “Turning 22” font as it will compliment and contrast the colours in the background image and make the title more legible. You may choose to use the text layout already established in the template or rearrange it according to your own design tastes. I began by adding the title of the film (“Sorrowful Parting”) and then made some adjustments to the size, placement and alignment of the text. For the credits and quotes, I chose a more discreet font type named “Pinot Noir” in order to distinguish it from the title.
Step 4: Adding Laurels
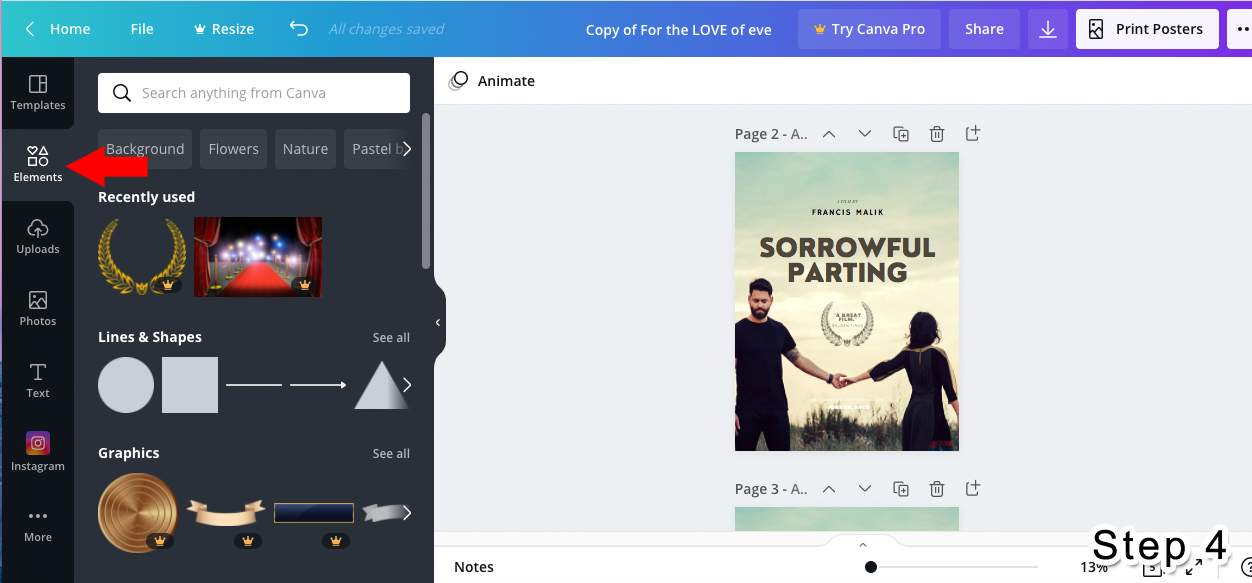
Adding festival laurels to your poster will communicate to viewers that you’re a seasoned filmmaker whose work has screened publicly and has even won a few awards. In Canva, you can access laurel graphics by selecting the “Elements” tab on the left-hand menu (certain graphics require a subscription while others are free). You may also choose to import laurels that you receive from a festival by clicking on the “Upload” button in the left-hand menu. If a festival does not send you laurels, Filmfreeway, the largest festival submission platform, will allow you to create custom laurels at the following link (https://filmfreeway.com/laurels/generate).
Step 5: Producing Key Art for Various Media Outlets
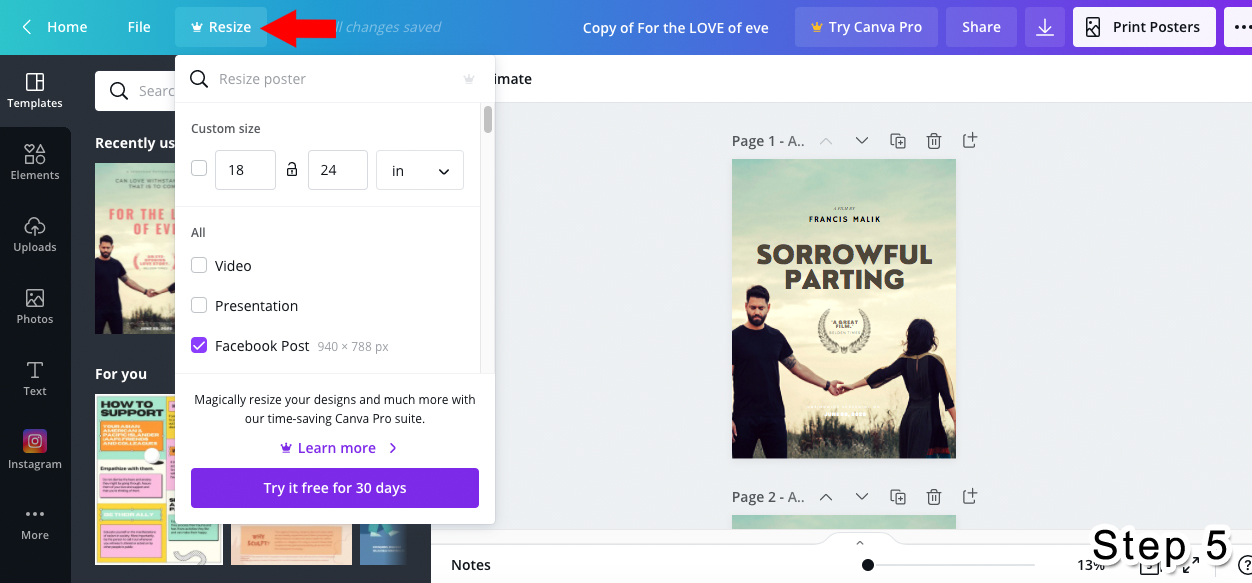
Now that your key art is complete, you may want to version it for various social formats as well. Many festivals will want versions for Instagram Feed and Stories. Canva allows you to instantly resize your artwork for any major social media platform. When you click on the “Resize” button at the top of the screen, a drop-down menu will appear that allows you to edit the dimensions of your image (this feature does require a subscription or 30-day trial). Please keep in mind that the channel where you will be publishing your key art should dictate its design. For example, if this image will be shown on a small computer screen, use close-up photos and highly legible text. f it is going to be viewed on a large marquee, you can use more “subtle” imagery and smaller text. It’s also wise to check with the festival to find out if they have specific dimensions that they desire for your poster.
After you have completed your key art, market your film on as many channels as possible to reach a broad audience. With the money you save creating promotional material on Canva, you can afford to put some spend behind your posts. Many festivals will assist you in this process and offer support in order to help generate buzz for you and your movie. A strong poster can help distinguish your work from competing films at a festival and also serve as an enormous asset when it comes time to find a distributor. These images help draw potential viewers to your program and will bring you a little bit closer to your Hollywood dreams.
__
Note From Tongal: This blog is part of a series of Tongal Community-written blog posts that were originally sourced in the Tongal Blog Open Call Project. The views and opinions expressed in this article are those of the author(s) and do not necessarily reflect the official policy or position of Tongal. Read more Tongal Community-written posts here!