

At Tongal, we work to ensure the success of our filmmakers and support them as they advance their careers – whether they’re just starting out or are seasoned professionals. With that in mind, we’ve created the following resources, which will give you all the information you need to hone your technical skills and ensure a stress-free delivery process!
We’ve compiled click-by-click instructional documents, template images that make checking “text safe” a sinch, presets you can install to automate your export process and more! Read on to learn more about what’s in our Portal and how you can make use of these resources!
Text Safe Images:
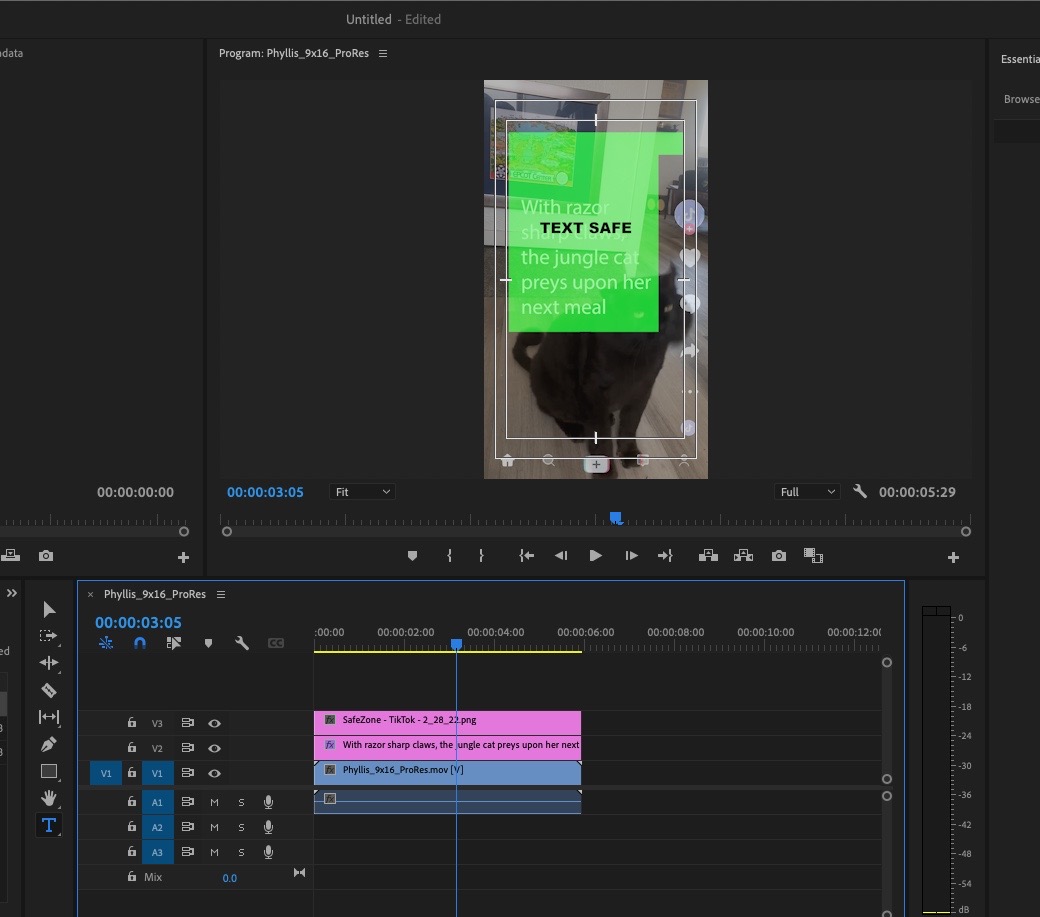
Text-safe simply means that any text in your video fits within a specific parameter of the frame. With many different platforms like Facebook, TikTok, Instagram, and Twitter, you have different layouts where buttons live (think: like, share, comment). Before delivering a video, you’ll always want to make sure that your text does not appear behind these buttons.
To make it easy, we’ve created Text-Safe Guides, which can be downloaded here.
Simply layer the semi-transparent image over your timeline and scroll through your video to make sure your text is within “The Green Zone”.
Organizing Your Project Files Tutorial:
When creating your project, the organization of your project at the start is just as important as your final video. Review these great tips to not only set you up for success with your Tongal delivery, but also learn best practices for other platforms you may create for in the future!
Delivering Your Project Files Tutorial:
When Tongal collects your project files, what we’re asking for is your editing file (.proj), plus all footage, graphics, audio, music, fonts that appear in your final timeline. When we open your project files, the expectation is for all of those assets to automatically link to your timeline. Once approved, we then archive it on our end.
We’ve put together a click-by-click tutorial, to help you get our post-production department exactly what they need.
Export Presets + Preset Installation Tutorial:
Don’t know how to set your export settings so that you meet Tongal’s Specification Detail? Great news! We’ve automated it for you!
Export Presets (.epr) are files that can be imported into your export window to automatically set the export settings for you. It just takes a few clicks and streamlines the entire process. You can find the downloadable presets and click-by-click tutorial here.
Specification Details
Specification Detail (sometimes shortened to Spec Detail) is a document that lays out all of the attributes that your final video should contain. This could include, but is not limited to, frames per second, progressive vs interlaced, frame size, etc. Here at Tongal we have our own online and broadcast specification details found here.
We still recommend you use the Export Presets from the previous entry, so it takes the guessing work out of the master creation process.
Uploading Masters Tutorial:
In short, your “masters” are your final deliverable video(s), audio file(s), caption file(s), and image file(s) the client will be receiving.
Ready to upload your masters to the Tongal site? Follow this tutorial that lays out the steps you'll need to follow for a successful delivery.
Captions Information:
You may be asked to deliver caption files (typically .srt and .vtt files). There are many services available online to have these files created for you. We personally recommend using a captioning company called Rev, which makes the process easy and accurate at a low cost.
You can find a more detailed guide regarding captions here.
First Cuts, Sponsor Notes + Revisions Tutorial:
You’ll be required to send the First Cut of your video to the client. Follow these steps to ensure a successful submission.
Depending on the project you may have access to free audio libraries. Double check the project brief to see what’s available!
Now that you’ve turned in your first cut, you may have notes and revisions that need to be addressed. Follow this tutorial that breaks down the revisions process.
Glossary:
What the heck does “bit-rate” mean? No worries! Our video terminology glossary will help you find clarity, should you run into a term you haven’t encountered yet.
We're Here to Help!
We know that, for newer filmmakers, this may be very new information to you. Please don’t hesitate to contact us at assets@tongal.com to assist with any issues you may have. We want you to succeed and look forward to working with you!